

I have had these night stands forever it feels like, before the twin pregnancy. I held onto them because they were just so different, but the problem is with holding onto furniture and storing it here and there and moving it from place to place, it starts to get pretty beat up. Beat up furniture is usually not a problem but this one had some water damage that made some areas bubble a little. I fixed most everything but one of the tops just wouldn't return to flat so it is what it is. Everyone tell me they can't see it. I reply with BUT I CAN! The perfectionist in me just can't allow it but since they came out so well I still put them up for sale just not at what I normally would.

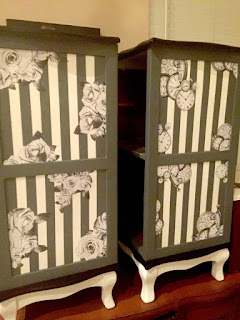
First my plan was to do something simple lol, like a black top white base with a simple stencil down the front....haha quite the difference to what the final project turned out to be.
I started out simple with all white and black top and it wasn't enough so I added the black base....well the line where the wood meets wood wasn't straight and very noticeable when it was black against white so I decided to make the frame grey and leave the inside white but I couldn't get a nice straight line with that either but that was mostly just impaicenece. So that's when I decided to do the lines. The measurement inside the square was 11.5" and the tap was 1" and so it was a pain in booty to get them straight and the same size. After spending about an hour trying that I had an epiphany. I decided to use my silhouette cutter and make lines that way I could at least figure out where I wanted the middle line to go and line up the next.


I taped and painted it again with white to fill any holes that might still be there with the tape then painted with grey. I didn't tape well enough apparently and next time I will use frog tape so I had some leaks. So I had to touch those up and it still wasn't the perfection I was going for so I decided to cover up the imperfections with some paper images. I used flowers for the girls and stop watches for the boys.


Same type thing was going on with the inside of he cabinet doors. Every time I would need to touch up or work on the front side I wild mess up or get the back dirty so I decided to take newsprint paper and layer it on the back....next problem, I used my printer instead of kinkos. Well my print is the type the bleeds when you put mod podge over the top so it was turning a slight green and pink ARG! So I solved that problem with some black stain and made it all look darker. Anywhere I missed with mod podge the stain absorbed comletly blacking out any new print image. So onto the next problem solver. I added a flower for the girls and the stop watches for the girls.


I didn't have to do this but I thought it worked and why not with all the detail let's add a little more. So for the shelve I glued on some grey post card images. I just took some scrap book paper I had and printed it in black and white at kinkos so there was no bleeding there.

Next problem....the front of the cabinet. At first I cut out his and hers words with the silhouette but I used regular light paper which was fine for the his word but for the hers word it was way too flimsy and I also accidentally put hers on his of course lol. My husband was rushing me again ARG! So I took that off. Touched up the fronts and I had to fill in those lines because the glue had partly filled them in and it made it easier to glue the words on later anyway but it was a lot of extra work to fill and wait fill and wait then sand and paint. Then I was ready for the words again. This time I used black scrap book paper which was good but not. When I was glueing it, it didn't bleed but it did give off little black specks here and there. There was no helping that so it is was it is and very unnoticed if your not me. I even try to glue the fronts first so they would be sealed. I think next time I will spray clear coat them first.

The fronts of the drawers with the man and woman were the easiest part except for when I clear coated I got a yellow tint especially where the clear collected in the lines. So I painted over the yellow parts as best as I could without covering the man and women and clear coated with the usually poly instead of the triple thick that I had used at first. And cleared coated the rest of everything. So whoooo a lot of work for something I still feel has flaws but they are pretty darn cute and I learned a lot in the process

Before and after
No comments:
Post a Comment