Tuesday, April 23, 2013

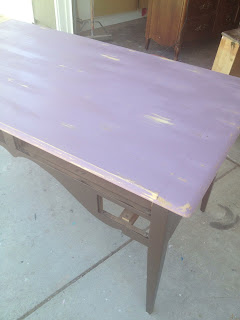
Made this for my wedding....going to be the dessert table

I wanted to have a slate blue and grey vintage style wedding, but the dresses were impossible to find in that grey/blue color so I ended up going with what I thought was a really light colored nude color for the bridesmaid dresses, but instead I got these weird beige color dresses that when we put them next to the blue stuff they looked like an ugly green so instead I went with the amnesia rose and used that as inspiration for all the furniture I am making for the wedding.  

The flower has like a mauve tone with light pinks and purples in it too.  

I got this at a garage sale for $10.  I love garage sales and of course the good ole Good Will.   

Pin It!

New shelving unit

This was my first time using chalk paint which I made myself using plaster of Paris, water and paint. It comes out pretty chunky so it's a good idea to use a paint mixer that you attach to a power drill. 

I filled some holes in it so I had to sand it in those areas, but the rest I left as is. It was a little scary because I feel like you should always prime and sand, but chalk paint says you don't have to so I guess you don't lol. 

I used a stencil for the sides and an antique white, which is pretty much white just not as bright. I just used a small roll on sponge and dabbed as rolled. The pain part was that the edges of the shelves come out so it was impossible to get the stencil to lay flat so I just had to do some touch up. 
The best part of this story is when my laziness took over and I didn't feel like going inside to clean the roller so I used the hose and when the spray hit the rolled it spun out all the paint that had been on it all over me and the plants. Smart move right?!

I tried to do a little staging for it, but I have so much stuff for the wedding and so much big stuff it was hard, but that painting at the top is an oil painting I did at school. I'm glad I finally got to put it somewhere. And that cute picture in the middle is of my adorable little one Addison Rose. 

I sprayed it with a clear sealant when it was done. And that was it. I'm still deciding if I was the line the back with some pretty scrapbooking paper or not. 

This is just the inside. All blue. Is only $99 and you can buy it from etsy, etsy.com/cahleyscouture/store. Or just email me hazyheavens@yahoo.con

Pin It!

Friday, April 19, 2013

Dabble in jewelry making too :)

Before I learned what I could do with furniture, I made jewelry, small boxes, some artist books, paintings (that were mostly done for school but still came out really cool) and sewing. 

These are some of the jewelry I made when I found how useful ebay was in saving money on charms.  A lot of my work deals with clocks, keys, locks and playing cards, but to buy any of those charms from somewhere like Joanne's or micheals it's like $4-5 for 1-4 pieces. Well on eBay (depending on the charm) you can get 100 for that same price if not lower, with free shipping. Just don't plan on trying to return anything because its free shipping from china, so to ship it back costs an arm and a leg! 

Time and keys man! I just love them, don't know why...just do

All this stuff and more can be seen and purchased on etsy search Etsy.com/shop/cahleyscouture

Pin It!

Wednesday, April 17, 2013

Today's projects

First I am going to take the coffee table I have been working on to match the side table with the newsprint and I am going to try to create an epoxy coating. Im scarded! I've never done epoxy and I really like the table so I really don't want to mess it up.
This is what it looked like before I put on the epoxy....I didn't do it quite right so I am waiting for my Costco size epoxy to come in the mail so that I can add another layer of it or 2.  I picked out a bunch of cool headlines and vintage ads and printed them out.  A lot of them I had to blow up to make the whole thing look like right.  

Now here is where I messed up and the epoxy didnt work out so well.  I didn't glue down the paper well enough so the tips that weren't glues down all the way got epoxy under neath and so when it hardened there are little tips of hard paper sticking up.  When I put the second and third layer of epoxy on it I am hoping it all works out.  I am thinking that it is going to look cool like the paper is just thrown on the table.   

This is me trying to figure out were to put the paper.  Even though it didnt work out so well when a big wind blew....but hey! I had a pic lol!


I know these pictures are really backwards, but this is where I started, I sprayed it first on the parts that would be seen with a spray primer.  (again in the wind...it wasn't even windy or so I thought, but even a slight breeze when spray painting can make all the paint go the wrong way) 

Painted the sides black

Next project that ended up taking me two weeks to get to ---->
But it wasn't because I wasn't working I was just working on 15 other things lol! 

Then the next project I've never done before and it scares me too, because I need to be better at that whole measure twice cut once idea. I'm going to try and attempt to put straight and centered antique handles on the project that I finished in the backyard.......I finally go to that today power tools and all! (4/23)
Pin It!

Tuesday, April 16, 2013

Painted laminate black and white side table

I know I have already posted about this piece, but I was a little over excited and it was finished yet. So here it is finished. A completely laminate painted distressed stained and sealed side table :)

I almost don't want to sell it but I have so many ideas and not enough room if anyone wand it, it's up for grabs. 
$299

I used an old newspaper print out I found or the New York Times for the inlay to the doors.


I covered the whole thing in that crazy poly sealant thats a pain to work with and turns a but yellow, but I sprayed a sealant over the newspaper first so that it wouldn't smear or get yellow. 

I sprayed the once goldish handles white and there you go! :D and you wouldn't believe that this thing was lamanite.  

Pin It!

Wednesday, April 10, 2013

Pretty chic side table refinished laminate

This was pretty much free from a garage sale. It came with a dresser they were selling for $20 and this for $5. So I used those mad negotiating skills and said $20 for both... Mad skill right?! Lol
Anyway first I took the hardware off then I did a light sanding with some 150 grit sand paper....try not to be lazy like me and do the details with a power sander, you end up taking away the indentation and it makes it that much harder when you go to paint on the white. 

So I sprayed this with the good ole Bissner Primer, just one coat, and then sprayed multiply coats of a semi gloss grey. 

From there I took some normal craft white paint and a small round brush and did the detail work by hand.  What was cool about using the semi gloss was if you made a mistake and got to it quick enough with a wet paper towel you could whip off the mistake.  The biggest problem I had was putting the white around the drawer. At first I had taped it off with some regular blue masking tape, well FYI, if you are really trying to avoid any bleeding of the paint go for the green frog tap it works way better. 

$199 email me if you are interested

Pin It!

Tuesday, April 9, 2013

Some pictures of my daughters crazy bunk bed in the making

So her bunk bed is one of those ones that has the bed on too and the bottom has a desk on one side and a dresser on the other. 
These are some of the drawers for the dresser and desk part.  

I used that crazy duck taped called frog tap to get the straight line and spray paint. For the other images I used stencils and spay paint. Some of the edges and out a little fuzzy and not as craip as I would have liked, but it looked fine. 

This was me trying to figure out what colors to use. 

Here's what some of the drawers might look like in although I rearranged where they are all going. They are all done I am just working on putting the hardware on, painting the shelves, painting the latter and the top part of the bed and I am inlarging this alice in wonderland drawing I did to go on the back of the desk part. Then it should be done...oh wait no there are these inlay areas where I am going to find some black and white diamond print wallpaper and put that there. Then ill be done haha! 

This I what the bed loooed like when I bought it. :) quite the change happening.
Pin It!

My very first project

This was technically my first go at distressing something. It was an old wood dresser my fiancĂ© had brought with him when he moved it. I was trying to turn it into an antique looking distressed piece, but it wasn't coming out right and I probably painted it and sanded it and stained it over and over again. 

It then sat in the back yard with some clear plastic over the top(that's what your seeing on the top and sides of it).  Yesterday I had some time cause the projects I wanted to painted were still in drying time for the holes that I filled. So I decided to take the stencil I have had since the start of this new hobbie of mine...so like 2 months ago lol...I used a mauve color sample I had bought in the beginning as well as just went at it. 

Since I really didn't care about this project at orat anyway and it was so many different colors anyway I wasn't too careful web I started doing the stencil (well the first stencil I was carful) then I realized that it didn't have to look perfect and actually looked better that way. So I just went at it with a small sponge roller. Half the time not even taping the stencil on and just holding it which let me tell you was a pain in the but because it kept moving and it was really windy so I would sugget tapping it....but I'm lazy and it worked. Lol
This dresser doesn't have any handles. It's the type that has the groove under the drawer to pull it out, but I think it will look so much better with some handles. Now I just gotta figure out which type. Do I want one long in the middle or two small on each drawer. And what color? Since there are so many I want to use the darker shade that is in there but usually the dark handles that I find are gold and I don't want gold. There is this completely trashed dresser I bought at a garage sale for $5 thinking I would fix it up, but it is missing one large drawer and one small. If it was just the large drawers that would be something, because I could make a shelve out of it or something. But it really is a p.o.s. when we moved it things would be cracking off and the whole thing feels like it is going to collapse at any moment. So I think I will take the hardware off which is nice simple vintage and put that to good use. 

It's funny the things you learn as you go though.  I was starting a collection of any antique looking hardware that I would fine cheap at the restore, only to figure out that the space between the handles where they get screwed in are all different.  And my dad, aka Mr. Fix it, said that most are always going to be four inches.  Well that maybe true for normal handles, but back in the day apparently hey thought 3" was the way to go. It works fine for this one since I have to drill holes for the handles anyway, but the other piece i am working on has some seriously ugly and unsalable 80's gold handles that are all 4" apart and I painted 3 coats before thinking of that so I could fill the plea and paint again UGH! Or just go fine some cute 4" ones. I'm going with finding some new handles. :$

Pin It!

Painting tip of the day!

So first off...  i have been trying to post uaing new pictures i take with my phone, but for some reason when I go to post pictures it never has the new ones on there. So for now i will post this and hopefully digure out how to add some pictures later.
...I figured it out...ok maybe not. Ill do another post with all the pictures of this project in the works.

So my fiancé tapped off the edges of the new project that I am working on like a mad woman...and since I am a paint first think later type (which isn't a good idea FYI) I had painted it a teal color which was just not right for the other colors I....well my daughter wanted me to use. I painted it again and then again, because it needed two coats to cover the mermaid tail green.


I got this bunk bed for my four year old little princess. It's one of those bunk beds with the bed on top and the bottom sides are a desk and a dresser. It's gonna save so much space and hopefully get her to want to sleep in her own bed at night. Well she told me that she wanted to top pink and the bottom purple. I wanted to try and use three colors, which is where the teal came in, but when I did a little test piece of wood I hated the way the teal went with pretty much any color, especially the pink and purple quarts I had already bought. So I tried to see about making it more of an aqua color with some hints of lime green, because I really loved the way the pink looked like next to this green that I already had. It's called asparagus by bear paint, but I have no idea where they came up with that name because its more of a lime green than anything. I'm pretty much obsessed with this color. I have painted two houses with in and now her bed, which is pretty funny since I am not the type to like the same thing twice never mind three times.... Well four if you count the shelves I want to try it on and distress them with blues and blacks (maybe).

Anyway: The painting tip is that if you are going to be masking with tape make sure you take the tape off before the thing has completely dried. Especially if you have three coats of paint over it.  
When I went to take the tape off it was so stuck that some of it peeled parts of the tape off and other parts of the tape wouldn't come off at all and I had to whip out the scraper to get anthem which in some parts I nicked the painted parts that didn't need reprinting and in others I scraped too hard and took off some wood.

So after sanding lightly and painting again. I am now waiting to paint one more coat and hopefully be done with that part.

I've been working on the drawers which have been coming out really cool. Driving me lightly mad but they are cool. The dresser part has 6 drawers and 3 shelves.  I'm going crazy because at first I was just gonna go crazy with pink purple black and white and have every drawer be different, but when I did the black and white striped drawer and the black and white clock drawer they were just too cool so now I have to figure out how to arrange then and make all the drawers for both the desk and dresser look like they at least somewhat belong to the same piece of furniture.

So far my idea is to do the six draws every other one being the black and white strip and the ones in between being the black with the white clock. Then the 3 drawers to the desk.... Since I had already done one drawer black and pink striped and it came out too cool to paint over, I'm gonna do the black and pink stripe in the middle with pink drawers and white clocks on the top and bottom. I would have done more of the black and white stripes,  but I think that I am going to do the top of her desk in large black and white stripes.

Then in these little inlets my dad is going to cut some thin wood to fit and I am going to use some diamond black and white patterned wallpaper on them instead of painting the diamond print myself.
Pin It!

Wednesday, April 3, 2013

Black and White Distressed Small Table/Cabinet

This is the side of one of my new projects, the doors are black distressed and I am going to decoupage old newspaper in the center of them as soon as I can figure out how to measure them out right :)
This is what it looked like before and you can see why measuring in the middle of those doors is going to be a pain in the butt!

So something about painting this....well first of all it is all made of particle board and laminate. (I know doesn't look like it does it, it was a surprise to me too) So I used Kiltz primer, two coats and then I measured and taped off the areas I wanted black.  At first I wasn't going to leave the strips straight maybe with a little bit of grey stain to make it look like newspaper, but when I pulled the tape off some of the black seeped under the tape so there was areas that had black spots on the white, NO FUN! So instead I just sanded the edges of the lines to make them look old and like they ran into each other.

Then I took this "clear stain"  it was super thick and not clear, it was kinda tinged yellow.  But it is a seriously great thing to use to make sure that your piece doesn't get messed up.  I don't know if it was the brand of stain or that it was really old and that was why it turned yellow.  It worked out though, because I was going to use the old newspaper that was tinged yellow too.  My dad got me some new stuff from home depot and I am going to try that on that next one.

Well I am off to spray the clear coat on another piece Ill show you next and hopefully get the doors done on this one.
The finished drawers

The whole finished project

I'm 


Pin It!